Let us start with a somewhat heretical hypothesis:
In order to start with test automation one does not need to know much of the test cases that are to be automated. As long as one knows what part of application's user interface is going to be excercised one can start automating right away.
This is "heretic" because most people would comment it with: "How can you automate something, when you don't even know how would you perform it manually?". Well, we do know how it will be done manually! We don't know the exact flow of the test, that's right. But we do know that one is going to use the application's GUI to perform it. If there is an edit field on the way, we know it will either be entered, checked or ignored. Regardless of the test to be performed. If the test is concerned with application's functionality (our focus), this is all one will ever do with this field.
We can go on with this and ask what about list boxes, drop-down lists, combo-boxes, push buttons, check buttons, radio buttons, static text, tree views, tables, etc. It is all the same. We have not measured it statistically so we won't use any numbers to claim what everybody knows: most of the application out there use only a few basic UI object types in order to express even the most complex concepts that "hide" behind the surface. If your application is one of them, our approach can be very interesting.
So, when we write our test script we write one line of code for a particular GUI object, say, edit field. This line "knows" how to enter the text into the field, how to compare it's content against some expected text and it knows how to ignore the field (do nothing with it). This is typically the only place in the whole test suite where we deal with this particular GUI object. It does not matter whether you have 1 or 1735 test cases that affect this field - it will be this line of code that did it. This line does not know what to enter or check and it does not know in what context or for what purpose it is doing it. It simply does it. The "what" and "for what purpose" comes from a different place - not from the code.
Then we write another line for the check button next to our edit box. And another for the next check box. And another... We group these "lines" into blocks according to some functionallity criteria. The lines that "belong to each other" form a block. For example first name, last name, street, zip, town, country would form an Address block.
We often enter navigation elements into our "blocks" such as picking from the menu bar or pop-up menus, keyboard strokes, double-clicks, clicks on push buttons, etc. This makes things more complicated but at the same time flexible so one can combine those "blocks" as needed.
EMOS FRM makes a clear distinction between what "lands" in the test scripts and what doesn't. So our primary classification is:
test data
test scripts
The focal point of EMOS FRM approach is the separation of test data from the scripts. We include almost everything in the test data (navigation + data + a few other bits). The test scripts serve mostly just as a technical implementation of what has been defined as test data. The scripts are so to say "slaves" of the test data. What and how is something being tested comes from the test data, not from the logic of some script. This is what makes EMOS FRM different from most of other test automation approaches.
We store test data in the so called data tables. Data tables are Excel spreadsheets. They are formatted in a special way so that we can "marry" two rather opposite objectives. First, the format must be suitable for automatic processing. On the other hand, the data must be structured in such a way so that test scripts know how to efficiently access it. Second objective states that the data must be suitable for manual processing because it is created and maintained by humans.
Due to the complexity of the test data and the relatively limited possibilities for its representation (table-like format) it is not an easy task to meet these objectives. Here an example...
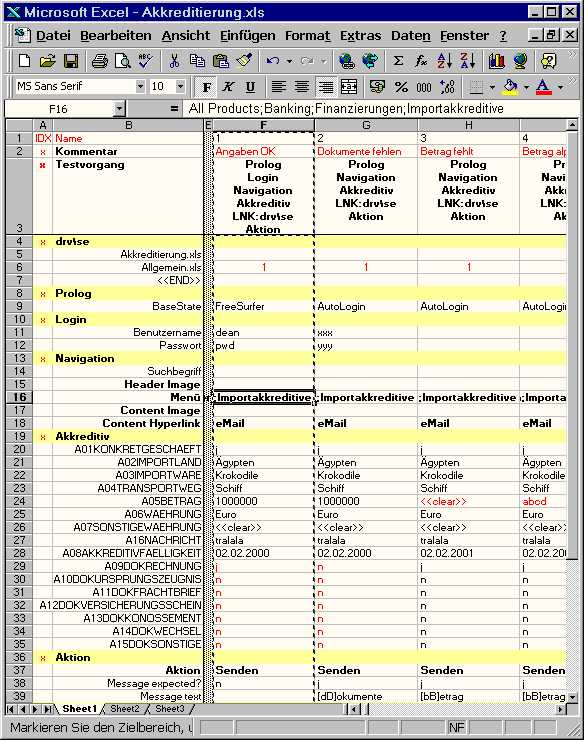
First thing to notice is that test cases spread across columns. There are many reasons why we have chosen this representation. The strongest one is that we want to be able to handle very complex test cases, i.e. applications. It is not unusual to have hundreds of lines in one test case (meaning that hundreds of GUI objects need to be accessed with a single test case).
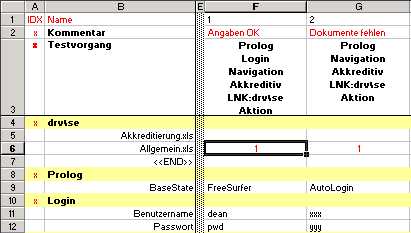
In our example we see test cases 1, 2 and 3 in columns F to H. Obviously, the first line is reserved for test names, and for names of other columns such as IDX and Name. The EMOS FRM provides a programmatic interface which is capable of accessing each column by its name (the same principle as the DDT-interface from WinRunner).
![]()
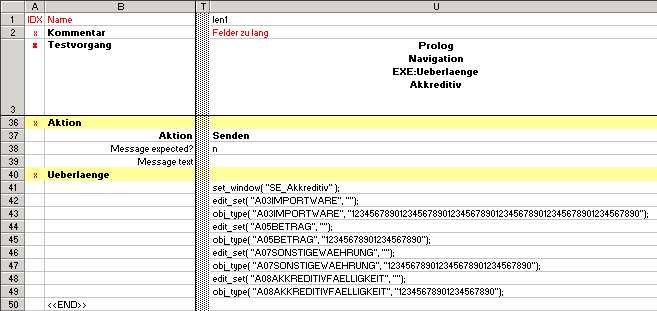
Columns IDX and Name are reserved names - EMOS FRM expects to find these names in each table otherwise the table cannot be opened. These two columns go "hand in hand" and have the purpose to identify rows by some mnemonic name. Usually, we do not want to access each row directly (remember you may have hundreds of lines in one test table). In order to identify the rows which need a direct access we place an "x" in the column IDX next to the row name.
In other words the important rows start with an "x". In our example these are the Kommentar, Testvorgang, drv\se, Prolog, Login, Navigation, Akkreditiv and Aktion.
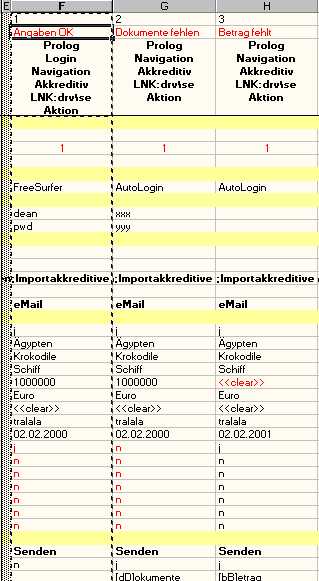
The row labeled Kommentar is reserved for the short description of each test case. In our case we have written a note that test case 1 contains valid data that should raise no error (the correct interpretation requires some knowledge of the application an the purpose of the particular data table). The test 2 is marked as the one where some sort of documents are missing, the third test is missing an amount and so on.
![]()
The importance of this data is that the content of the particular cell is written in the test report. It helps us identify the purpose (objective) of the particular test case as we analyze the results.
Although this row is not mandatory - the EMOS FRM concept can live without it - our strong advice is to use this mechanism as much as possible for all your testing. It facilitates immensely the results analysis. To indicate its importance we place this row usually as the first one - after the Testname - in the data table (technically, it can appear anywhere within the data table).
The so called Test Sequence-Row is beside the Column Name-Row the most important row in the data table. This row is mandatory. EMOS FRM needs it to determine what steps are to be executed and in what order shall they be executed. We have labeled this row in German, "Testvorgang", as everything else in our example. You can name it any way you like as long as you provide the equivalent parameters in the corresponding test scripts.

EMOS FRM analyses the corresponding test sequence cell for each test case (e.g. F3 for test case 1, G3 for test 2, etc.) and calls the individual steps in the defined order. For example the test 1 executes steps Prolog, Login, Navigation, Akkreditiv, LNK:drv\se and Aktion. The individual steps within a sequence are separated with newline-characters (Alt-Return in Excel). We use the term "steps" here to indicate the elements of a sequence.
Effectively, these steps "point to" the so called test blocks - the central concept of EMOS FRM which will be explained in detail later in this text.
As for the other columns (i.e. other then IDX and Name), they are reserved for test cases or for comments. Our example shows the column E as a comment-column. You can often see such columns in our test tables. We use them to visually separate columns - they bare no other information - they just improve legibility of the test data. In this case we separate the columns IDX and Name from the test cases 1, 2 and 3.
So far we were discussing concepts which are concerned with the technical aspects of our EMOS FRM. With the exception of Test Sequence we won't spend much time discussing them again. They just make other things possible.
The "real thing" are the higher, logical concepts such us:
test primitives
test blocks
test cases
test sets
test suites
They build upon each other. Therefore let's start with the simplest one - test primitive.
A test primitive is the basic element for building test blocks.
Normally, a test primitive corresponds to a single physical GUI object. A phisical primitive defines a family of operations on a particular GUI object type. For example operations on an edit field are "read the value", "set the value" and "check the value". Operations on a static text (non-editable text field) are "read" and "check". Operation on a menu entry is "select", and so on.
A test primitive can also be more abstract. In this case it can represent anything - it is just a piece of information passed to the test script to be interpreted in whatever way the script prefers.
In both cases, physical or abstract, the test primitive is a piece of information in a data table which is "passed down" to the test script.
|
A test primitive is always
represented with a
single
line in a test table. |
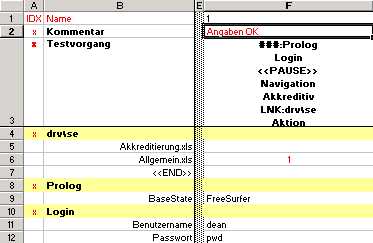
The following example shows three physical primitives on lines 11, 12 and 14. They all correspond to some GUI objects. In our case edit fields Benutzername, Passwort and Suchbegriff.
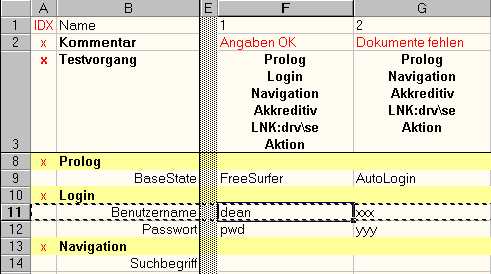
An example of an abstract primitive can be found on line 9. BaseState does not correspond to any GUI object. It is a piece of information, "FreeSurfer" or "AutoLogin" that, in this case, indicate what algorithm is going to be used to initialise the test.
Later on in the text we will talk a lot about the code that "implements" both physical and abstract primitives.
A test block is the central concept of EMOS FRM. It is the basic element for building the test cases - the test LEGO.
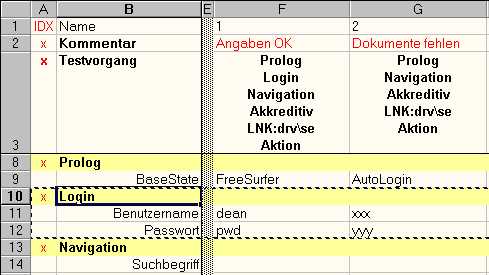
Test block consists of zero or more test primitives. The primitives that build up the block are usually related to each other in some way. For example the following figure shows three test blocks: Prolog, Login and (a bit of) Navigation.
Prolog is an abstract block. It does not correspond to any visible part of the application.
Prolog performs some initialization for the test cases that use this block. For example test case 1 (column F) and 2 (column G) both call Prolog as a first test step (we will explain row 3 later). Prolog initializes the test case in that it drives the application to a particular state. The rest of the test can then start from a known (assumed) state.
Indeed there is more to be said about Prolog. We have chosen this name to give it the feeling of an idiom - we use it over and over again. We always try to design test cases to start with some sort of "prologue". This block is typically a complex function (or a chain of functions) that "knows" how to start the application, how to drive it down gracefully or how to kill it if the application's state could not be determined. The robustness of the whole test suite greatly depends on the robustness of this one test block.
In our example all that the "prologue" needs to know is whether to start the application in "FreeSurfer" or "AutoLogin" mode. The first one means "no login". The other one means "log in with the name of the computer and some predefined password". We feed the function with the desired information by the mean of an abstract test primitive BaseState.
Login, on the other hand, is a physical block. It corresponds to the Login-part of following GUI excerpt:
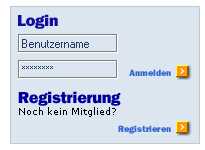
Primitive "Benutzername" corresponds to edit box Benutzername. In this test case the script would enter "dean" as the user name. Primitive "Passwort" follows the same analogy.
A test block is indicated by an "x" in column "IDX" (column A) and, by convention, by a different (yellow) background to increase the visibility.
A test block can be executed in three modes:
SET mode
CHK mode
GEN mode
For example if you specified the block Login in test 1 as
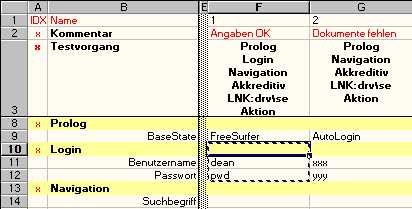
it is the same as if you said
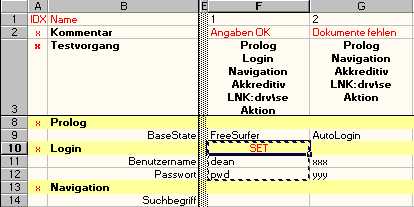
Wit the SET mode you instruct EMOS FRM to enter the data. In this case the physical primitives Benutzername and Passwort would enter values "dean" and "pwd" respectively (i.e. edit_set). In case of a list box the SET mode would select an item. In case of a radio button the given state would be set and so on.
The SET mode is normally the most often used mode. For this reason the default mode (when left empty) is the SET mode.
It is very important to note that if a primitive is left blank (e.g. Suchbegriff in block Navigation), EMOS FRM ignores this field. It does not enter anything. It does not even check the field exists. It simply ignores it. As if the primitive would not have existed. In case that empty string needs to be entered (i.e. to clear the existing value) one must use the keywords "<<clear>>" or "<<leer>>" (e.g. see line 26 in Figure 2 above).
Instead of entering data one can use a test block to check the data. To do this one needs to set the CHK mode:
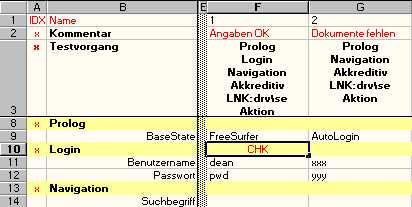
In this case the test would check that fields Benutzername and Passwort contain "dean" and "pwd" respectively.
Analog to SET mode if a primitive is left blank, nothing is checked. If you need to check for the empty fields, use "<<clear>>" or "<<leer>>" instead.
GEN stands for "generate" mode. Imagine you specified the following
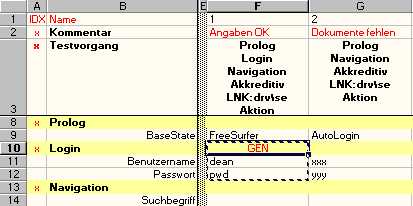
EMOS FRM would in this case update the test block with the content it "finds" on the AUT at the moment of execution of the particular block. In other words, if application displayed a Benutzername "aaa" and Passwort "***", these values would replace the existing "dean" and "pwd".
Imagine you have dozens or hundreds of GUI objects in your AUT. GEN mode is a great way to generate your test cases. The process is simple: you run your application manually, as you reach certain points you stop and set the GEN mode for the corresponding block, you run that block to "photograph" the application and continue with the manual test.
The sequence of test blocks builds up a test case.
A typical "black box" test case is usually defined as planned execution of selected logical paths with the aim of demonstrating the expected behaviour. The execution flow of such test cases is a sequence of actions enriched with occasional checking (verification) along the way.
A test case in EMOS FRM is normally represented with one or more columns in the data table. Each test case consists of at least the following three mandatory parts:
test name,
test sequence,
test block(s).
Each test must be identified with the uniqe name (within the scope of a particular data table). The names of all test cases in a particular data table are defined in the first row of the data table.
Theoretically, the test name can be almost anything (anything a ddt_val() can return). There are no syntax constrains for the test names. However, we tend to use numerical names for the test cases (e.g. 1,2,3,...,n) or we combine short alphabetic names with the sequence number (e.g. len1,...,lenn). We strongly recommend this practice because it repeatedly showed to be the most practical for the real-life usage. If you want to describe your test cases (you should feel the need for something like this!), do not use the test name for it. Simply allocate the number. There are plenty of other places that you could (should!) use for such purposes.
The test sequence is defined in a particular row of a data table - the test sequence row (we have mentioned it earlier). This row is identified with the keyword (default: Testvorgang, but you can name it anything you want) and is placed as one of the first few rows in the data table (2nd or 3rd). Since test cases are defined in columns each column has its own sequence.
The test sequence consists of entries separated by the newline character (in Excel use Alt-Return to enter the newline as part of the cell data). There are syntax rules for test sequence entries:
[key:]test_block_name
An entry that consists only of the mandatory test_block_name specifies this particular block to be executed.
A test_block_name can be prefixed with an optional key which must be separated with the column (:) from the block name. The key specifies the type of action that is to be parformed on the particular test block. Here follows the complete list of keys currently implemented:
SET:block_name CHK:block_name GEN:block_nameThe above examples specify the block_name to be executed in SET, CHK or GEN mode respectively.
LNK:block_name LNA:block_nameThe above examples specify the so-called "link" operation. The link is the way of expressing that another column (i.e. test case) is going to be executed (possibly located in a different data table and/or using another test driver). The difference between LNK and LNA is that EMOS FRM only loads the particular column if LNK is used, whereas LNA specifies the whole table (i.e. all not-yet-loaded columns) to be loaded before executing the particular column. There are subtle reasons why you would want to load all columns at once. Recall that we often say that test cases are usually defined in columns. In cases when they are not in columns you would need the LNA. We do not plan to describe these "special cases" in this text.
The name of the test block and it's structure is in case of LNK/LNA somewhat unusual. The block_name specifies the name of the test driver (WR test script) that is called to execute the column. You can specify the path (e.g. c:/wr/scripts/drv/xxx) or just the name of the test (e.g. xxx) if the searchpath within WinRunner is correctly set.
In the example shown in the Figure 15 we see one LNK-block occupying the lines 4 to 7. Note the name of the block (B4:drv\se), the indcator of end of the block (B7:<<END>>), the "call" of the block (F3,G3:LNK:drv\se) and the usage of the block in test cases 1 and 2 (F6,G6: 1). An LNK block specifies normally three pieces of information:
the script (driver) to be used (B4)
the table(s) to be used (B5,B6)
the test cases to be executed (F6,G6)
Note that if you do not define the test case (such as in cells F5,G5) the test script is not called.
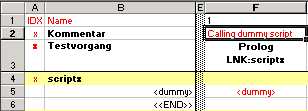
You can however use LNK to call practiaclly any TSL script you want, it does not have to be the so called "FRM driver" script. The only limitation is that you can pass up to two parameters to your script. If your script requires less than two parameters (an FRM driver always requires two parameters), then you need some "keywords" to specify what parameters are not needed. We use <dummy> to indicate the missing parameter. The following example shows how to call a test script "scriptx" with no parameters:
EXE:block_nameEXE specifies that the block to be called contains WinRunner commands and is going to be executed. Indeed, behind EXE there is a sequence of "eval" statements that (try to) execute everything you specified within the particular column of the specified test block.
There are very good reasons why such "ugly" coding might be necessary or even wanted. First of all, reacall that with EMOS FRM your test logic is in data tables not in test scripts. Imagine your test is supposed to perform some mouse dragging on a CAD application as part of some test sequence. The way to perform mouse movements of the from-a-to-b sort in WinRunner is by win_mouse_drag() commands. Where would you like to store such movements: together with the test case that really needs it or somewhere in some test sripts just because "the test code belongs to the test scripts not to the test data"? Think of it.
Analog to LNK/LNA blocks the EXE block also has some syntax constrains.
###:block_nameThe above example shows the comment. Use three hashes (###) to prevent the block from being executed without phisically deleting it from the sequence.
Finally, the only exception to the syntax specified above is the keyword
<<PAUSE>>which can appear between any other sequence entries. In interactive mode this keyword causes the test execution to be paused at some point. This is particularly useful if you want to "throw an eye" at the application at some particular point(s) during the execution of your tests. The following example shows block Prolog as commented out and a pause between blocks Login and Navigation.
We have seen so far that test cases are stored in data tables - a specially formatted Excel tables. We have also seen that these test cases are capable of "calling" each other in terms of links LNK/LNA. However, linking the tests together is not the mean for grouping tests into "bigger" units. Links group more columns into a single test case. What we need is a way to specify which test cases in what order and for what purpose are to be executed.
We use the term "grouping" (still looking for a better term) for this purpose. EMOS_FRM has one concept for grouping test cases into execution groups - a test suite. The test suite itself uses test sets as a way for defining subgroups.
As with the test cases EMOS_FRM uses Excel tables to define the test suites.
Test suite defines the scope (what test cases) and the order (what sequence) in which the test cases are to be executed. Test suite is physically an Excel table that specifies three important pieces of information:
flag wheter to perform the
following specification or not,
test script
(driver) to be executed,
data table
to be used,
test set (test cases) to be "picked" from the data table.
Any sort of other information could also be specified in the table. This information will be ingored by the FRM but it might be of high importance for the people that maintain these tables.
The following figure shows the excerpt from the SE_full_test.xls - a test suite that executes the complete test for the so-called structured emails.
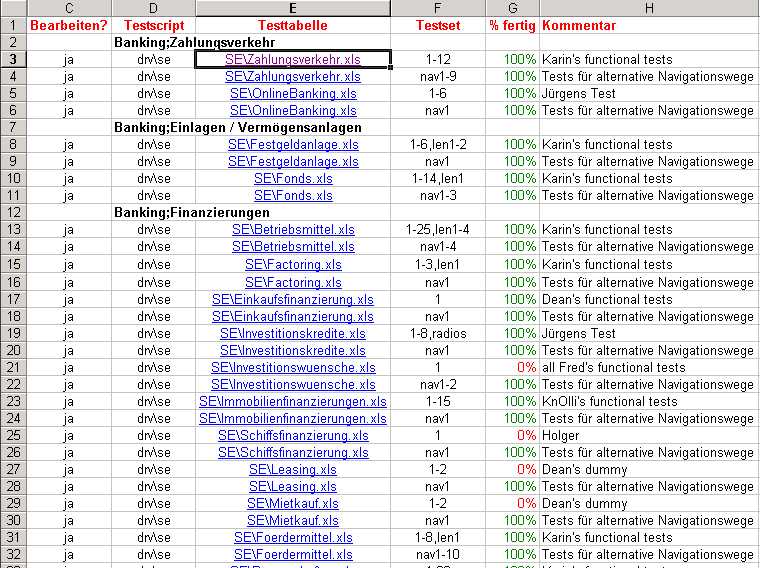
Note that the table is the "standard" FRM table - the first row is used for the column names. Also note that the excerpt starts with column "C". We usually hide columns A and B because they carry no information other than the column names. Columns A and B must however be present and must be titled "IDX" and "Name" so that EMOS_FRM can recognize the table as one of it's own.
Further notice the lines that contain complete information (3,4,5,etc.). Notice that we can have mutliple lines specifiying the same data table. For exmple line 3 specifies test cases 1 to 12 for Zahlungsverkehr whereas line 4 specifes test cases nav1 to nav9 for the same data table.
One can define many test suites, all picking from the same pool of test cases, but all with a different purpose. For example, imagine you need a
Test set is a mean of groupping test cases that reside in a single data table into a sequence that is to be executed
The concepts related to test data and the data itself have to be processed in some way. We write test scripts. WinRunner test scripts.
With EMOS FRM most of the code that needs to be executed has already been written for you and is part of the EMOS_GPL library set. The code that cannot be written in advance - the code that implements your test blocks - has to be written from scratch. Indeed, this is just about the only code that has to be written at all. Actually, if the block only contains physical primitives, it does not even have to be written - it can be generated. This is a long story...
We mentioned that the central concept of the EMOS FRM is a test block. The counterpart of the test block on a scripting side is a block function. In other words - you implement a test block by writing a block function.
Recall the test block "Login" from Figure 9.
It refers to the following part of the application:
The block is implemented with the following function:
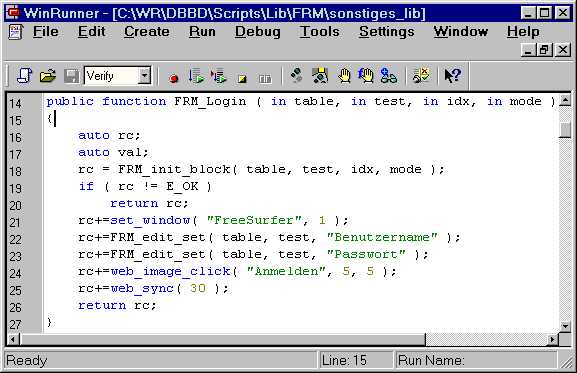
This is a stereotype block function. You can find dozens of such functions (mostly longer) whenewer EMOS FRM is being used. Let us analyse the details.
The first thing to note is that each block has a block function that belongs to it. Our block Login has a function FRM_Login(...) associated with it. It is not required but we recomend to use the same or similar names. We usually prefix the function name with "FRM_". This reduces the possibilities for name collisions (all function in WinRunner use the same name space!) with other, unrelated functions.
The code on line 18 is used to initialize the block function. We use the function FRM_init_block(...) to do this. In fact all block functions do this.
The initialization does two things:
positions the data focus to the beginning of the test block
initialises the block mode
Imagine we execute the test 1 (column F). The focus for reading data from the data table would be placed to cell F10. The block would be initialised to SET (due to the empty cell F10).
There is no point executing the function if the initialisation fails.
After a successful initialization we are ready to "do the job". In our case we must implement the test primitives (and eventually any other related task).
We did not talk much about the GUI maps so far. We do now. Remember that our blocks (at least the physical ones) refer to the GUI objects that are closely related to eachother. Within WinRunner these objects are typically grouped inside one window. The first thing our block functions do is to set the scope to a particular window.
Test primitives Benutzername and Passwort (rows 11 and 12) are implemented with lines 22 and 23. Note the 1:1 relationship - one row in the data table, one line in the block function. This is very important and it usually holds for all physical primitives. The FRM-functions were carefuly designed to support this "optical" relationship.
One does not have to write block functions this way. However, it is usually a sign of a trouble if you see a lot of logic (if-statements, loops, etc.) within a block function. The person probably did not understand the main message of EMOS FRM - a test case does not come from a test script, it comes from a test data. If you are only looking into the test data, then any "if" in a block function increases the separation between the code and the data. Remember, we don't want to look into the code. We want to know what is going on only by looking into the test data. The code is there only to support the data. That's the main difference beween EMOS FRM and other approaches.
Another interesting part is the fact that this block implicitly clicks on Anmelden image. This makes sense in this case because this is normally what is wanted when someone logs in. However, if there were some other possibilities (such as "Cancel" or "Help"), then we probably would not model it this was. Instead we would create another primitive, say "Action", and let people choose what image to press.
With creation of your block functions, most of your script creation is done. But a little work is left to do. You need a piece of code that provides the link between a block in your excel sheets and the corresponding block functions. This is the main task of a Test Driver. The Test Driver is a winrunner test script containing a switch statement of the following structure:
switch( vorgang )
{
case "Login":
rc = FRM_Login( table, test, vorgang, mode );break;
......
default:
tl_step( vorgang, 1, "Unbekannter Testvorgang
["&vorgang&"]" );
frm_rc++;
continue;
}
Let's have a look at these lines of code. Every time the Framework executes a test that needs to execute the Test Block "Login", it enters the Test Driver that correspond to that test (defined in the Test Suite Table) and steps through the switch-statement. In our example it switches to the Block function "FRM-Login". Every time you implement a new block function, add a corresponding "case"-statement to the driver.
If you store your Block Functions in libraries and/or use separate GUI-Files for each block (which both are good practices), you have to load them before use. Also some kind of reporting to the test results may be useful at this point.
A template of a Test Driver is provided in <EMOS_HOME>/xxx. Here you can see how things should be implemented.
After creating Block functions, Test Drivers, Test Suite- and Test-Excelsheets, you need some kind of entry point for execution of your Suite. This entry point is provided as a very simple winrunner testscript. It looks like the following:
static const TEST_PATH = TEST_HOME;
static const DATA_PATH = DATA_HOME;
static const SUITE = "TestSuite.xls";
static table = SUITE;
call "FRM/emos_frm_driver" ( TEST_PATH, DATA_PATH, table, FALSE );
This testscript is provided as a template in <EMOS_HOME>/xxx. Copy the template file to your <TEST_HOME> directory and assign the constant SUITE the name of your Testsuite-Excel-Sheet. Normally, this is the only modification you have to do.